When trying to make lavi’s hammer I did the normal search on google and looked at what other people had done and how they had made them, but bumped into the normal problems that always seems to happen with the big costume props, i.e. you cant get stuff outside the US or making the item so makeshift that it does not even make it through the cosplay day (or even worse so t*t pocks a hole in it to see what its made off) , hopefully this will help if you don’t have access to lots of posh stuff, it cost me about £60 to make
OK, we start with a trip to 2 shops, first my local DIY store, where i purchased:
-A long pieces of electrical conduit (this is a strong plastic tubing used to run electrical cables through, its normally black {which helps}, don’t get the white water pipe version if you can avoid it as its not as strong, and you’ll have the paint the devil)
-4 wall mounting clips for the conduit
-2 rolls of gaffa (duct) tape, 1 black, 1 white
-2 or 3 big cans of expansion foam (the stuff you use to fill gaps round pips and such
-1 can of black multi surface spray paint
-Some good strong plastic glue
Next on to a craft/art/stationary shop (in my case Stapes)
-one large roll of black poster backing paper (has to be as least as wide as the hammer head needs to be long)
add to that, some bits scrounged from around the home
-1 newspaper
-1 thick black permanent marker
-3 empty shampoo bottles (from our recycle bin)
-super glue
-bluetak/modelling clay/plasticine
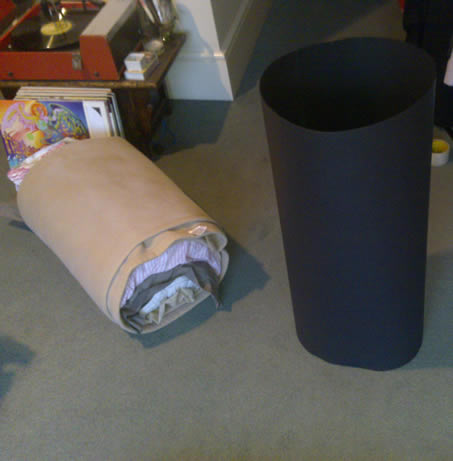
1) Now, I want the hammer to suit my size, so i watched a couple of episodes of d-gray man, so I can see the size of the hammer against Lavi, and then built a rough hammer head from pillows and blankets

2) Next I roll my hammer head in the black backing paper (at least a couple of layers as it will need to take a certain amount of internal pressure), and tape it in place, I now have a very very fragile hammer head
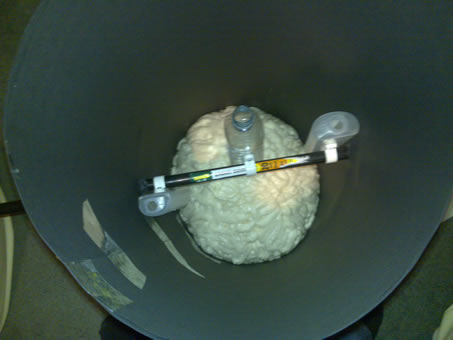
3) Before I can work any further I need to stabilise everything so put a couple of sheets of newspaper down, then put about 2 inches of expanding foam in the bottom ( now leave it for 15 mins for it to set and expand to about 4 inches)

4) While this is happening, glue 3 of the conduit clips to the plastic bottles

5) Once everything has set, bore 2 holes in the middle of your hammer head and thread the conduit through, slotting your glued plastic bottles in place, remember to leave about a foot sticking though one end as this will form part of the cross on the top of the hammer, also remember to support both ends of the conduit so it does not rest its full weight on your still fragile hammer head, then glue the clips that are attached to the shampoo bottles in place so they can’t slide up and down the conduit.
6) Layer foam inside the hammer head until its full, now, a recommendation here is to only lay down about 2 inches of foam and then let it set for 15 mins, then repeat, this means that all the foam goes hard.
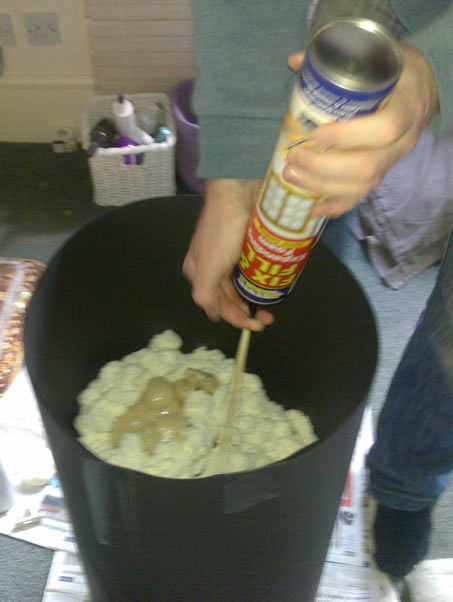
7) Once the hammer head is full, cut or sand paper it flat.

8) Now to make the cross t-bar, take your remaining conduit clip, and wedge and glue 2 bits of conduit (sawn of the long end of the handle {or you can buy some more conduit if you want to leave the hammer handle really long}) on each end.

9) Slide the t-bar on to the top of the hammer pole, and glue in place, next we need to make the tops of the cross, make 3 identical cones of paper, put a squirt of expanding foam in each and wedge them on the ends of the cross, happily this will stick really well, once set just shave the extra bits off, i used bits of bluetak to fill in gaps on the cross to make it nice and smooth.

10) Next using the spray paint, give it a good couple of coats, and finally using the white gaffa tape, put in the stripes. ( as Jamie Hewlett would say “ink the b*****d”)

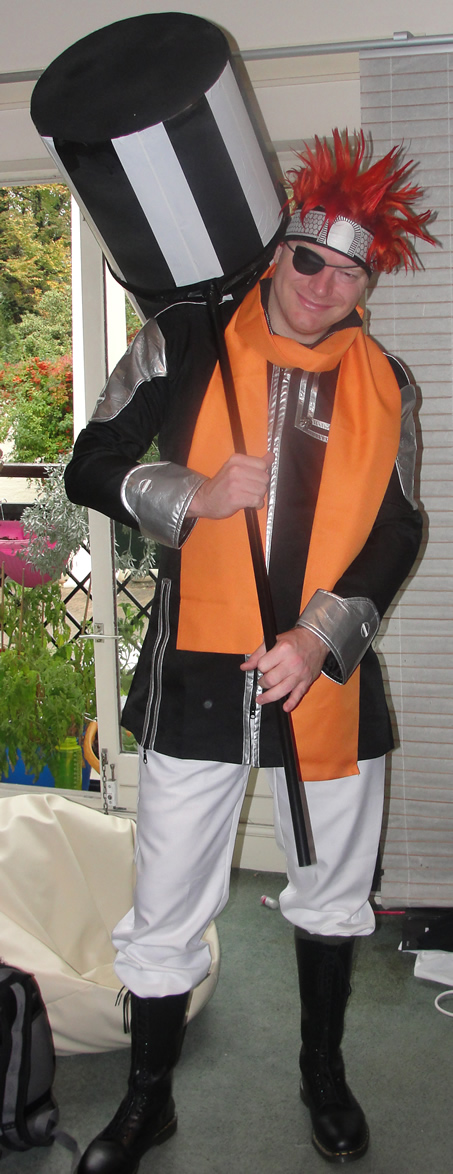
The whole costume can be seen here: The reason for the hair weirdness
Old Comments
Mark Myers(17/10/2011 14:32:20 GDT)
sorry for the slow reply
well everything started as black as i spray painted the lot (and just used white duct tape for the white bits), i did not have to do anything black afterwards.
i did not seal up the ends of the conduit, the 3 ends on the top had cones on them so did not need it (or have i got the wrong end of the stick?)
the permanent market was just used to tidy up places when i had not get ever crack painted properly or if there was a ragged bit of white tape
was there any other bits i missed?
kaileena(21/09/2011 01:49:00 GDT)
what did you do to make the outer circles black?? just spray paint it or glued some black poster board circles on it?? and what did you use the permanent marker for? you didn’t say. oh, and what did you use to seal up the ends of the conduit where it meets the hammer? i’m sorry for so many questions. it just seems like you left out some things. =P
Mark(28/05/2012 11:41:41 GDT)
Kaileen: the outer circles were already black, the white bands are duck tape, if that’s what you mean?
Permanent marker was useed just for cleaning bits up where spray pain was not suitable, the only bit of conduit that were not filled with foam (like the top) was the very bottom, and I did not block that up, any other bits I missed?
Many thanks
Mark
Yoru(17/07/2012 18:06:04 GDT)
Nice tutorial but i don’t really understand for what did you had the 3 bottles inside >< i’m not english so that can be te reason that i don’t understand this part
And did you glue a black circle after make it full? ><